
Section 1 – Connect the DSL Equipment
First, install the telephone line filters. The filters will help keep the DSL signal from interfering with your voice signal and vice versa. Without the filters, voice calls may be noisy and DSL service may not work at all. Filters are necessary for each phone jack currently in use on the same line as the DSL service ( same phone number). This includes phones, answering machines, satellite receivers, fax machines, etc. Filters are not needed on unused phone jacks.
Next, take a moment or two to get familiar with the DSL modem/router. The following images may match the equipment provided, but is being used here for illustration and may vary.
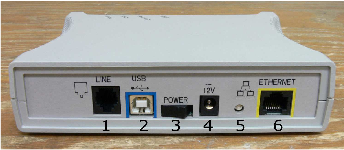
1. “Line” (Telephone) Jack
2. USB Port (not used)
3. Power switch (Not present on all models)
4. Power Connector
5. Reset button (location varies)
6. Ethernet (network) Jack
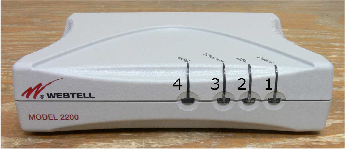
1. Power Light
2. DSL Light – Should be solid while DSL is working properly
3. Ethernet Light – Should be solid while connected to the PC, but it will blink with activity
4. USB Light – Not used (off)
Connect the router as follows:
- Connect a telephone cable from the Line jack on the router to a telephone wall jack (filter). It is preferable to connect the line through a surge protector if one is available.
- Connect the AC adapter cord to the power port, and plug the adapter into a power outlet.
- Connect the Ethernet cable to the Ethernet port on the back of the router, and to the back of your computer.
- Turn on the power switch (if present), and wait a few moments.
As the router starts up, the DSL light will blink slowly as it tries to find a signal on the line. After a short time (usually around 30 seconds) the light will blink slightly faster as it tries to synchronize with the equipment at the other end. Once the modem/router is “in sync” the DSL light will be solid and should stay that way.
If the DSL light does not stop blinking, there are several different reasons this could happen.
- DSL Service is not yet active on the line. Check with HPC to see if DSL has been provisioned on the telephone line.
- Filters are not installed properly or are not present on every phone. If you do not have enough filters, you can temporarily unplug the additional telephones or devices to see if the modem will sync. If it does, obtain and install additional filters.
- There may be a problem with the inside telephone wiring. A problem with the inside wiring can be checked by trying to plug the router into another phone jack, using only the telephone line and power cable. If possible, you can also try to plug the router into the box outside where the telephone line enters the house.
- Check the PC to be sure it is set to communicate over the network.
- Click Start.
- Click Settings (On some systems, this step may not be needed).
- Click Control Panel.
- Locate Internet Options and Double Click
- Click the Connection tab.
- Select “Never dial a connection” located beneath the square box.
- Click OK.
- Close the Control Panel window.
- There may be a problem with the DSL modem/router. You may bring the DSL modem/router back to HPC to have it tested.
At this point the connection should be complete and your DSL service should be ready to use.
If you will be using an HPC e-mail account click here.
If you are not using an HPC e-mail account, please provide us with a valid e-mail address so that we may contact you if necessary.
For support, call us at 275-2456, e-mail us at support@hpcisp.com, or visit our website at http://www.hpcisp.com
